Free Software Development Logbook
Introduction
This post is created for the Free Software Development course taught by Professor Paulo R. M. Meirelles at the Institute of Mathematics and Statistics (IME) at the University of São Paulo (USP). The course is designed and maintained by the research group FLUSP. You can find all tutorials and more detailed information on its official webpage. More information about the course (content, references, etc.) can be found on the official website Janus for the courses, MAC5856 - Desenvolvimento de Software Livre.
The objective of the course is to introduce students to free and open source software. In Portuguese, both terms mean the same. The course covers basic concepts, appropriate languages, ethical and technical aspects, etc., with the goal of promoting and constructing open and collaborative software. The course focus is to learn and contribute to open projects like the Linux kernel for the IIO subsystem.
In addition, there is a new tool implemented for the VMs developement and linux modules design, creation, and testing. The tool is kw, a kernel developer workflow tool. More information can be found at kworkflow.
NOTE
The course focuses its tutorials and practices on the Linux kernel subsystem Industrial I/O (IIO). This subsystem is designed for handling sensors and other devices that provide analog-to-digital or digital-to-analog data conversion, making it a critical component for industrial and embedded systems. The device used for the course is a Lenovo laptop with Ubuntu 24.04.2 LTS.
Tutorial 1: Setting up a test environment for Linux Kernel
The first tutorial of the course provides an introduction to QEMU and libvirt, powerful tools designed to deploy virtual machines (VMs) quickly and efficiently, eliminating the traditional complexities and time-consuming efforts typically associated with VM setup. Both QEMU and libvirt are libraries used for virtualization and resource emulation, enabling users to create and manage virtualized environments with ease.
The Linux kernel architecture tested is an ARM for the industrial I/O subsystem (IIO).
A detailed guide can be found at: Setting up a test environment for Linux Kernel Dev using QEMU and libvirt writtten by Marcelo Schmitt.
Summary
The tutorial is divided into the following sections:
-
Preparing testing environment directory and “all-in-one” script
- Create necessary folders and files.
- Give the required permissions for files and folders.
-
Set up and configure a VM running a guest OS
- Create an
activate.shfile to deploy VMs manager. To enable it, execute the comandhome/lk_dev/activate.shor, located in the folderlk_devuse.activate.shorsoruce activate.sh, this will print some green text and a pink prompt preamble to indicate you are in the VM’s manager. - Check image OS properties and partition size, then resize the disk image to 5Gb to give space for more linux modules.
- Extract kernel and initrd images from OS image to create the VM with them
- Activate the
libvirtdamen to usevirshcommands. In addition, starts a default network (to connect the VM with internet) with virsh. It will also enable autostart and persistence for the network. - The output for the point, is a bash function that creates a VM named arm64 that creates a VM with some default configuration defined in the activate file.
- Create an
-
Configure SSH access from the host to the VM.
- Allow ssh connection with the current VM’s credentials, user root without password. There are two important settigns you must done: enable permit root login and permit empty password. This its done by modifying the
/etc/ssh/sshd_configfile. - Reconfigure the sshd keys and restart the sshd damon.
- Now, it is possible to connect to the VM machine via ssh, using a client-server approach. Furthermore, it is possible to sent and recive files using Secure Copy Protocol (scp).
- Allow ssh connection with the current VM’s credentials, user root without password. There are two important settigns you must done: enable permit root login and permit empty password. This its done by modifying the
-
Fetch the modules loaded in the guest kernel.
- Export the modules installed. To keep the same machine in every moment, it is highly recommended to create a file with the modules used, this can be done wiht
lsmod > vm_mod_list.
- Export the modules installed. To keep the same machine in every moment, it is highly recommended to create a file with the modules used, this can be done wiht
-
Set up host <-> VM file sharing (optional)
- This part was tried but for now is not working. After implemented the changes suggested (memory backing and file system configurations) the machine does not work, it does not boot.
Useful Commands
lsmod- Show the status of modules in the Linux Kernel, more info here.create_vm_virsh- To create a VM with the kernel, initrd, and memory defined in the activate file. This have to be executed once.virsh start --console VM_name- To start a created machine use.virsh list --all- Display all VM availables and their current state.virsh destroy VM_name- Destroy the machine, force to close the machine. It is used when the VM does not response.virsh undefine VM_name- Forget the VM in the manager. This should be executed together iwth destroy.
Troubleshooting
SSH Configuration
In the part 3, if the /etc/ssh/ folder is missing, it indicates that SSH is not installed on the system. To resolve this issue, follow these steps:
-
Update and upgrade the system packages:
sudo apt update && sudo apt upgrade -
Install the OpenSSH server package to enable SSH functionality:
sudo apt install openssh-server
This will download and configure the necessary SSH dependencies, allowing you to establish an SSH connection.
Destroying VM
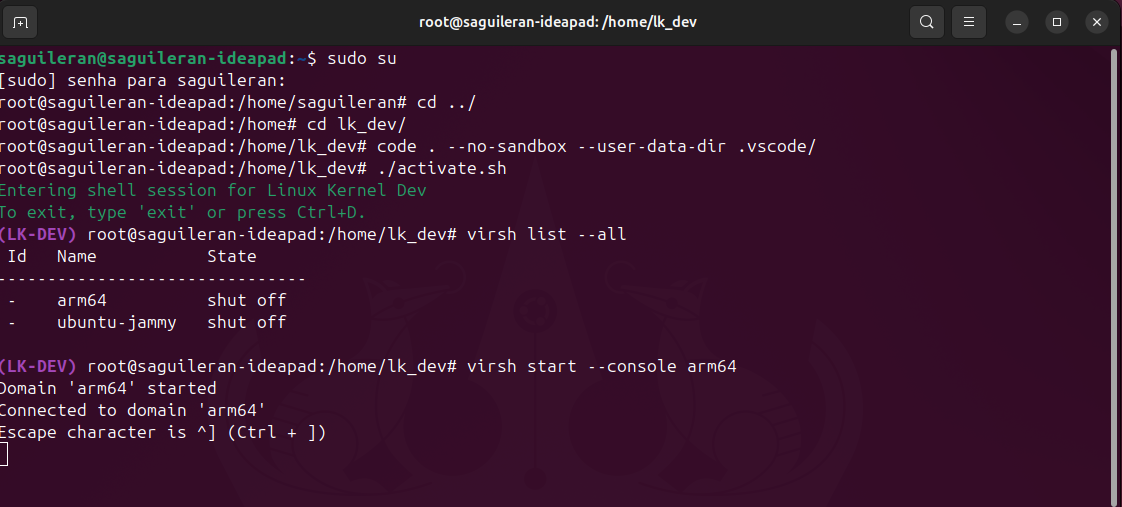
There is a minor issue when destroying and undefining the VM. After the machine is killed, it may freeze when using the virsh start command and fail to display the login prompt. However, you can still access the VM via SSH. To resolve this, ensure the VM is properly shut down before destroying it, and verify the VM’s state using virsh list --all. If the issue persists, consider restarting the libvirt service:
sudo systemctl restart libvirtd
Additionally, check the VM’s configuration and logs for any inconsistencies that might cause the freeze. The image below shows the problem.
Shared Memory
To edit the VM configuration use EDITOR=vim; virsh edit arm64. As mentioned before, after implemented the suggested configurations the machine does not work, there is an available blog to solve the shared memory issue: Virt-manager cannot find virtiofsd - discourse.nixos. It was tested but does not work`
Comments
Although the tutorial introduced powerful tools, their usage is clearly detailed, making them accessible and easy to follow. In my experience, the challenging part was managing the VM with virsh, as a domain must be properly defined and either closed or shut down to after using, or reset to update changes. On the other hand, despite being an Ubuntu user, I found the image types (qcow2), kernel, initrd, and VM building processes to be entirely new concepts. Considering the environment setup, it was fascinating to define a simple environment with constants and functions, which is somewhat similar to the .bashrc file in Ubuntu for managing user-specific shell configurations.
ADVICE: Always is requireted to restart the environment after make a change in the activate.sh file.
Parctical excersie: Ubuntu Jammy and AMD64 kernels
As a practical exercise, let’s try to create a VM using the same Debian version but for an AMD64 architecture. The image is at http://cdimage.debian.org/cdimage/cloud/bookworm/daily/20250217-2026/debian-12-nocloud-amd64-daily-20250217-2026.qcow2 and use an Ubuntu image. Since the previous image is lightweight, let’s test with a more robust image. To download visit the website https://cloud-images.ubuntu.com/jammy/current/jammy-server-cloudimg-armhf.img. Then, following the same steps explored in the tutorial it is enough to add two new create_vm_virsh funtions to the activate file environment for each
function create_vm_virsh_amd() {
   sudo virt-install \
      --name "amd64" \
      --memory 4096 \
      --arch aarch64 --machine virt \
      --osinfo detect=on,require=off \
      --import \
      --features acpi=off \
      --disk path="${VM_DIR}/amd64_img.qcow2" \
      --network bridge:virbr0 \
      --nographic
}
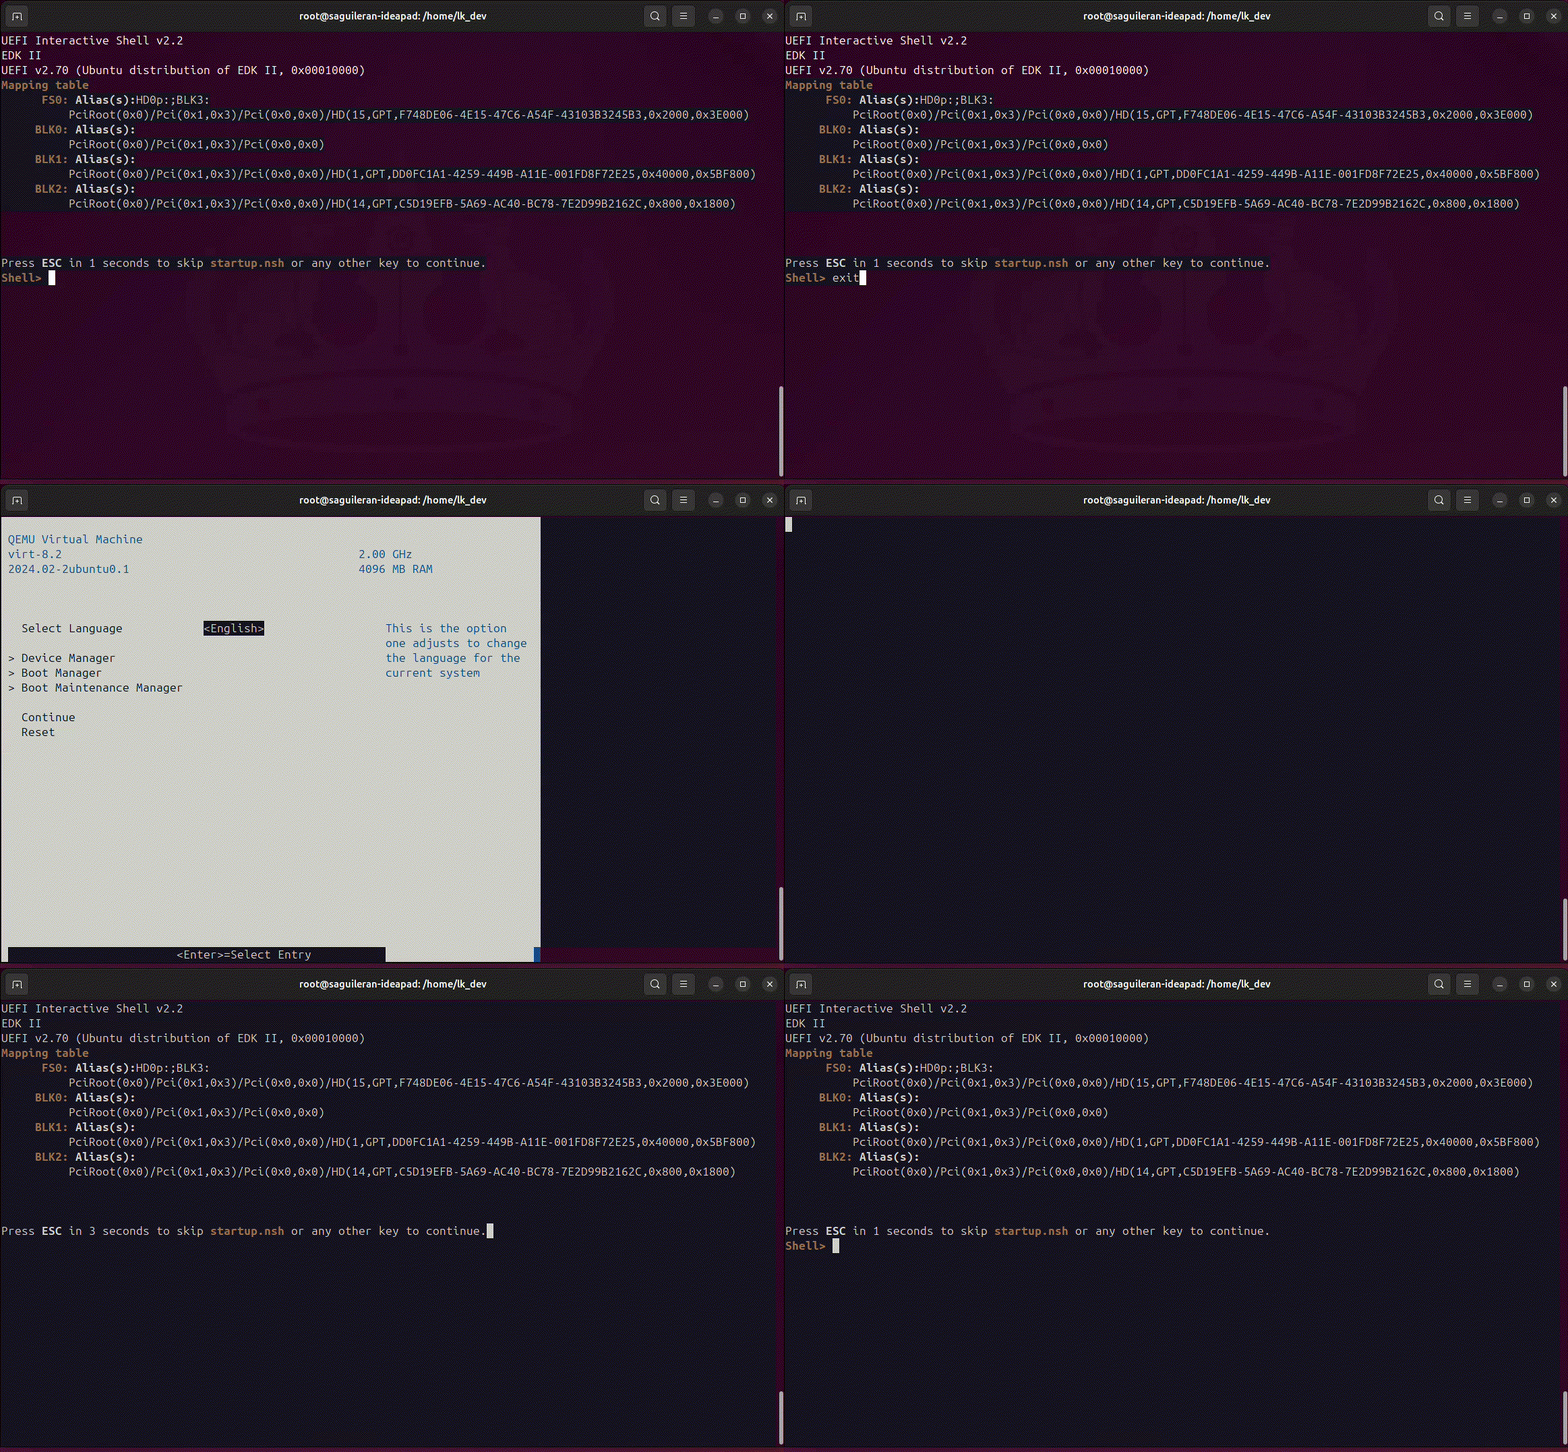
The other function. create_vm_virsh_ubuntu, is pretty similar to the tutorial exemple but changing the name and disk path.
Conclusion
Although all steps were executed successfully, the Ubuntu machine did not perform as expected. This issue likely stems from the kernel used in the tutorial, which includes numerous updates, configurations, drivers, and components that differ significantly from those in the latest version of Ubuntu Jammy. As for the AMD image, it was successfully created; however, due to a lack of in-depth knowledge about AMD systems, its usage was limited to basic operations.
Tutorial 2: Building and booting a custom Linux kernel for ARM using kw
In this tutorial, we explore how to build and compile a Linux kernel with an ARM architecture. The kernel is customized and then booted. The source code is obtained from the Linux community and loaded into memory or hardware, with or without virtualization. Four our case since server and host are sharing the resource the VM uses virtualization. The tutorial also explains what a kernel module is and how it can be written, loaded, and unloaded in the system.
An important concept introduced is Cross-compilation, a process where code is compiled on one architecture but executed on another. In our case, we use x64 or x86 host systems to compile and test ARM64 systems. Although these architectures differ significantly, the key distinction is that ARM is designed for devices like smartphones and tablets, while x64/x86 systems are typically used in laptops and desktops. ARM offers several advantages, such as energy efficiency, low battery consumption, and performance comparable to common x64 systems.
Finally, the kw software is introduced. This software enables fast and efficient creation and management of virtual machines (VMs), significantly reducing the effort required for setup and configuration.
A detailed guide can be found at: Building and booting a custom Linux kernel for ARM using kw written by David Tadokoro.
Summary
-
Installing kw
- Clone the official
kwrepositoryhttps://github.com/kworkflow/kworkflow.gitand switch for the unstable branch, this branch is also very stable and contains new updates created for the developers that are not included in the main branch. - Install the software by executing
setup.sh --full-installation. The flag passed for the isntallation script is for including tne dependencies installation. - To update kw use
kw self-updateif is the main branch, in other case add--unestablefor update the pacakge respect the unestable branch.
- Clone the official
-
Cloning a Linux kernel tree
- Linux kernels can be found in many official places. These repositories are also known as trees, because the software designed is a tree-like hierarchy. You can get more information of the linux by looking the version name. The most updated official tree versions are known as mainline, also as Linus Torvalds’s tree.
- Download the IIO subsystem tree by cloning the repo
git://git.kernel.org/pub/scm/linux/kernel/git/jic23/iio.git. This repository contains a huge quantity of comments and weveral branches, since it is a educational excersie is enough to download a single branch (testing) and a few commits, the last 10 for example. This is done using git and its flags.
-
Configure kw in a local context for IIO development
- Initialize
kw. This create an isoleted environment for the kernel development, or even create multple environments for a singe tree. - Start the libvirt deamon and the default network, to enalbe ssh connection.
- Start the VM created in the first tutorial with vrish and check the IP for the VM. If everything goes correctly, now you can connect to the machine with
kw ssh.
- Initialize
-
Configuring the Linux kernel compilation
- To customize and module the building process the Kernel Build System is used, it uses
makeand other GNU tools, it always generates akbuildand.configfiles. These files contains information about the modules configurations, between other stuff. In most of the directories of the kernel there are always aKconfigfile, furthermore there are default configurations, know as deconfig files. In this part, we create default configurations and then update them with new values, both actiosn are executed with make. To do it, the modules list created in the first tutorial is passed to make, to keep the same modules eviroment and make debugging easer. - It is possible to edit the
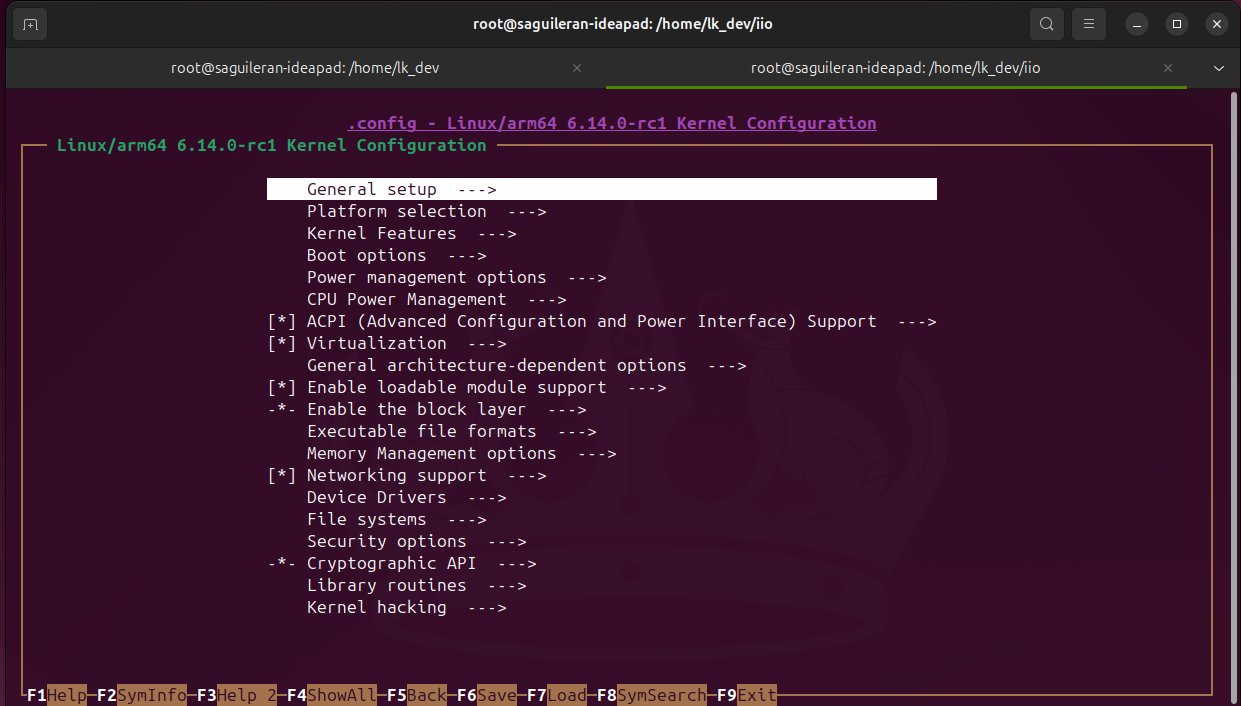
.configfiles directly although it is not recommended. Instead, a safer and more practical way is to use a Terminal User Interfaces (TUI) provided by kw. It is done withkw build --menu. The TUI has many advantages specially for new users. To test the TUI a change in the kernel image is done, expanding or modying it. To verify the change check the building information usingkw build --info.
- To customize and module the building process the Kernel Build System is used, it uses
-
Building a custom Linux kernel
- At present there are many manufactures for hardware with different architectures, where everyone has different instructions for reading and integration. As result, it is necesarry to donwload a suitable GCC compiler, for ARM64 architecture. In debian systems the library is
gcc-aarch64-linux-gnu. - Add kw configuraitons fo the arch target architecture (ARM64), corss compiler, and kernel image (the one created in the second tutorial with the name
Image.gz). To check if everyting is sucessfully setup use the commandkw condif --show build. - The last substep is compile the linux kernel with the local configurations implemented,
kw build.
- At present there are many manufactures for hardware with different architectures, where everyone has different instructions for reading and integration. As result, it is necesarry to donwload a suitable GCC compiler, for ARM64 architecture. In debian systems the library is
-
Installing modules and booting the custom-built Linux kernel
- Although the module was created it is still not installed in the VM, it is necessary to move the module objects. This is done with
kw deploy --modules. It is always required when modifying or adding modules. - Update the activate script with the new kernel in the launch and create functions. Then, activate or reload the main environment.
- To implement the changes done it is required to poweroff the VM and remove it from the virsh manager. Then, create it again using the new kernel configurations.
- Start the VM and check if the changes were sucessfully. This can be done by verifying the kernel version information with
uname --kernel-realse. You have to see the new name with the modifitacion done. - For kernel developers the final step is to install the kernel in the machine. This is done via
make install. Nevertheless, since QEMU and libvir are being used they take of via pinking up the kernel image.
- Although the module was created it is still not installed in the VM, it is necessary to move the module objects. This is done with
It is possible to use different cross compilers because there are many availables online comming from different vendors.
Useful Commands
kw --version- Print information about thekwrelease installedkw build- Compile Linux kernel from source considering local configurationsuname- Displays information about the operating system and hardware of a Linux or Unix-like computervirsh net-dhcp-leases default- Check the ip VM
Troubleshooting
There were no important issues. The tutorial was completed sucessfully.
NOTE: Always power off the VM before making any changes or edits to the environment or the activate.sh file. Failing to do so may result in unexpected issues. This tutorial was completed without errors; the issues encountered were primarily due to improper VM usage, such as skipping the VM reboot step.
Comments
The tutorial was completed smoothly and without any issues. The installation and configuration of kw were straightforward. The custom Linux kernel was successfully loaded. One of the most important concepts introduced was the creation and use of the .config file. This file was generated and configured using make, along with the VM modules, and managed through kw’s kernel configuration tools.
Another key feature introduced was the kw menu, a powerful tool for managing VM modules, drivers, and other configurations. This interface simplifies the process of customizing and managing kernel settings.
Once everything was properly set up, the final step involved building and deploying the custom kernel with the defined local configurations. Thanks to kw, this process was remarkably simple, requiring just two command lines to complete.
Tutorial 3: Introduction to Linux kernel build configuration and modules
This tutorial explains how to configure the Linux kernel build process. The configurations are made in the Kbuild files and through the kw menu configuration interface. After creating two modules—a simple module and another that calls it—their initialization and exit functions are tested by loading them into the kernel. The process includes verifying module information, loading and unloading the modules, and checking kernel logs to ensure proper functionality.
A detailed guide can be found at: Introduction to Linux kernel build configuration and modules. Written by Marcelo Schmitt
Summary
-
Creating a simple example module
- Start by creating a C code, Linux is written in c and some in assembler. The code contains two static cuztomized functions for initilize and exit, bot are loaded with the kernel libraries and the final lines is the license. The modules are saved at
drivers/miscsubfoler.
- Start by creating a C code, Linux is written in c and some in assembler. The code contains two static cuztomized functions for initilize and exit, bot are loaded with the kernel libraries and the final lines is the license. The modules are saved at
-
Creating Linux kernel configuration symbols
- Create a Kconfig configuration symble, this means to add some configurations to the Kconfig file. The configuration added has the same name of the module, im lettercases, and attributes (trista, default, help, help, depends on, select) which help the user for more control and setup.
- Add the module to the list of build objects in the Makefile.
-
Configuring the Linux kernel build with menuconfig
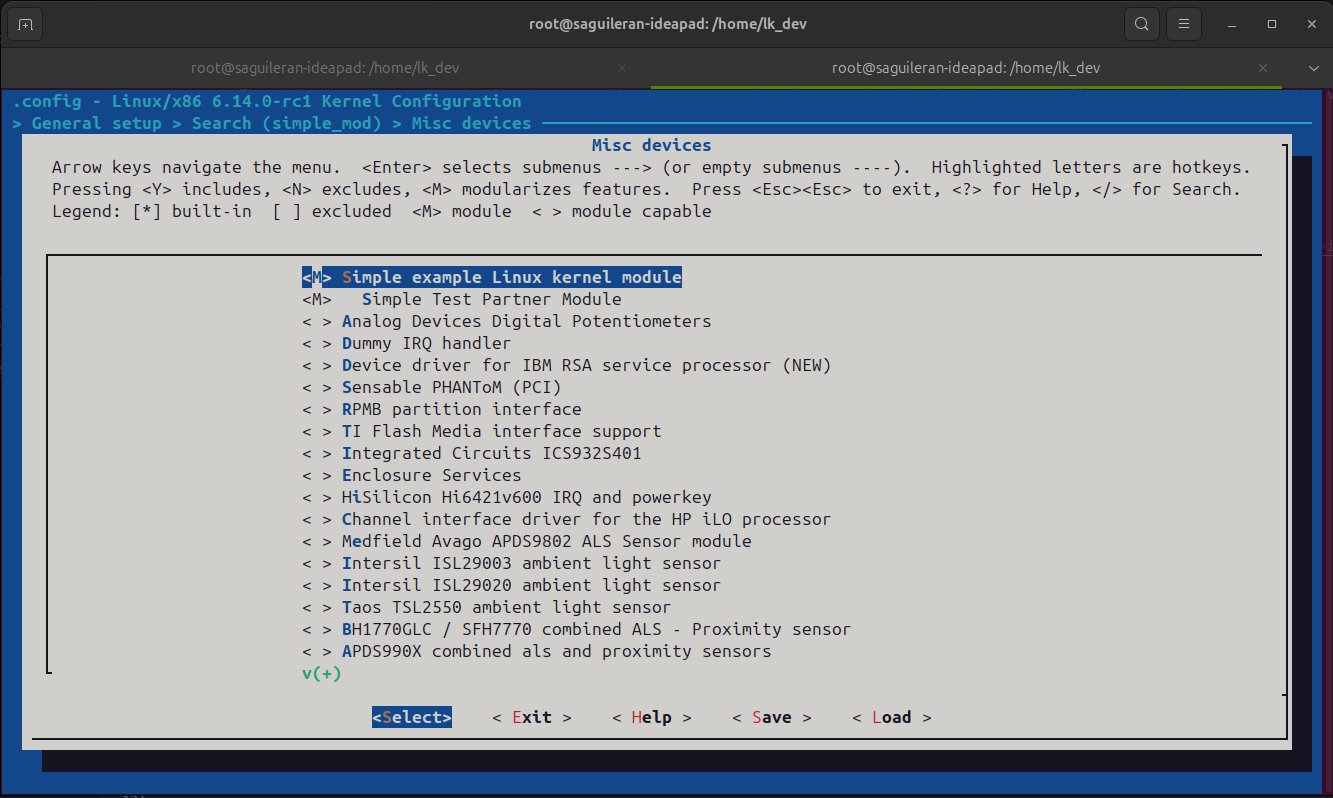
- Enter to the menuconfig and enable the module. Go to general setup, search the module by name, select it, and then enable it to be loaded.
- Build the image an modules again, update the
Image.gzthen mount the VM and isntall the modules, taking in account the customized module - Start the VM and acces to it, could be via ssh.
- Verify the kernel version,
uname --all.
-
Installing Linux kernel modules
- Verify the modules loaded (
modinfo simple_mod) and the smplae mod information (lsmod). - Load the module, module file (.ko), to the running kernel (
insmod path/to/module.koormodprobe module_nam). It is also possible to remove the module withrmmod module_nameormodprobe -r simple_mode - Display the tail of display message, driver message, to check if the module start and exit functions were executed sucessfully. They have to print the same message defined in the first step.
- Verify the modules loaded (
-
Dependencies between kernel features
- Add a callable function to the module. This function is called from other modules and displaies a simple message that contains the module name. In addition, the init and exit functions are updated to be more dinamycal, print the module name from where there been called.
- Rebuild the module to update the version in the VM, via scp or kw.
- Create a new module to call the sample module. This module also contains an init and exit functions. Then, load the new module and test it as same as before, use the
dmesgcommand to chaick the tail after loading and unloading the module.
Useful Commands
make -C "$IIO_TREE" menuconfig- Menuconfig to enable modules and setup kernel configurations.kw build --clean- Clean any artifacts from previous compilationskw build- Build image and modules.dmesg | tail- Show last kernel log messages.modinfo <module_name>- Show information related to the kernel module.insmod <module_name>- Loads module at given location.rmmod <module_name>- Remove kernel module.modprobe <module_name>- Loads module of given name and its dependenciesmodprobe -r <module_name>- Unloads module of given name
Troubleshooting
There was a simple issue when loading the module. After creating the simple example module, the configuration symbols were added, but the simple_mod module was not included in the list of build objects. As a result, when attempting to test the module, it failed to load and did not function as expected. This minor error highlights the importance of both steps: configuring symbols and ensuring they are added to the list of build objects.
Another issue encountered was related to shutting down and unmanaging the VM. When the VM is shut down and removed from the kw environment, the SSH connection is forgotten. Although it is still possible to connect using a standard SSH command, it is highly recommended to reconfigure the connection through kw for a smoother workflow.
Comments
It was clear how the basic functions of the modules, such as the initialization (init) and cleanup (exit) functions, operate. However, a deeper analysis requires more advanced knowledge of the C programming language and hardware interactions. The use of kw significantly simplifies the configuration process by automatically identifying the kernel image and the IIO tree path.
One of the most valuable insights from the results is understanding how the functions are invoked. With the addition of a second module that calls the simple module, the driver messages displayed using dmesg provide a chronological log of function calls. This log demonstrates the order in which drivers are loaded, reflecting the sequence in which they are listed.
It is worth noting that the addition and configuration of modules are performed outside the VM, within the activated environment, directly in the Linux kernel directory. In contrast, the testing and verification of these modules are conducted within the VM environment.
Tutorial 4: Introduction to Linux kernel Character Device Drivers
This tutorial provides an introduction to Linux character devices, complemented by a practical example: a basic character driver. These character devices facilitate sequential data transfer between the user and the system using dynamic data streams. They act as a bridge between software and hardware, managing device operations, data flow, and access.
A detailed guide can be found at: Introduction to Linux kernel Character Device Drivers written by Marcelo Schmitt
Summary
The topics cover are:
- Character devices
- Major and Minor Numbers
- File operations
- Bringing device IDs and file operations together
-
A character device driver example
- Create a C code a
- Testing the
simple_chardriver
Troubleshooting
The results from the read test program, Read buffer: �մ��, and the write program, Error: 9wrote -1 bytes to buffer, were different from what was expected. This discrepancy arises because the implementations are overly simplistic and do not account for hardware characteristics or proper error handling. To address these issues, the programs should be enhanced to include robust error-checking mechanisms and adapt to the specific hardware requirements to ensure accurate and reliable operation.
Comments
As a new student exploring the Linux kernel, this tutorial provided an excellent overview of key concepts, particularly the structure and functionality of kernel modules. It clarified how modules are created, their purpose, and the process of writing them. While the tutorial included the necessary code, I spent considerable time analyzing and understanding the logic behind many lines. However, the hands-on testing process was invaluable, as it demonstrated how modules can be tested, modified, and integrated into the kernel effectively.
Tutorial 5: The IIO Dummy Simple Anatomy
This tutorial provides an overview of the IIO Simple Dummy module, a foundational example illustrating how kernel modules are structured and implemented. It covers constants, functions, methods, structures, registers, and more. The complete module can be found on GitHub at IIO Dummy Module on GitHub. Additional documentation and resources are available on the Welcome to IIO Tasks page, which offers comprehensive details about the module.
The tutorial focuses on the key components of a basic kernel module, emphasizing how to read and write data using channels. It also includes a practical example demonstrating the integration of both read and write functionalities. This serves as an excellent starting point for understanding the anatomy of kernel modules and their interaction with the Industrial I/O (IIO) subsystem.
A detailed guide can be found at: The iio_simple_dummy Anatomy written by Rodrigo Siqueira.
Summary
The tutorial parts are:
- The IIO Dummy Channels Setup
- The
iio_dummy_read_raw()Function - The
*write_rawFunction - Putting Things Together with Probe Function
Troubleshooting
Since the tutorial is mostly theoretical, explaining code concepts and structures, there were no significant issues encountered. The explanations provided were clear and detailed, making it easy to follow along and understand the material.
Comments
Despite the tutorial covering several topics, the functions contain numerous lines of code and variables, making them challenging to comprehend. Rodrigo has made a commendable and highly appreciated effort in summarizing all the information about the dummy module into a single tutorial. This consolidation is invaluable for new users, saving them significant time and effort that would otherwise be spent searching for this information or directly analyzing the code to understand its structure.
Regarding the practical aspects, while the code is well-documented, creating, or mofifying, a module or function remains a significant challenge. It demands a deep understanding of the C programming language and the intricacies of driver operations.
Tutorial 6: Sending patches by email with git
This tutorial describes how to configure Git to send emails using a Gmail, or any other emails sever. In addition, there is a brief description about the git send-email command, what flags we are going to use and the meaning of each one. Finally, there are a few tips to test the patch before to sending it, it is highly recommended to avoid send incorrect or wrong styled messages to the main repository.
The patch consists of two parts: the cover letter, which is optional but highly recommended, and the message for each commit. These are specified using flags in the git send-email command. Each commit generates an email containing three sections: the header, the body message, and the code differences between the current code and the proposed changes.
-
Header: The header includes essential email metadata such as the sender(s) (
From), recipient (To), and subject (Subject). The subject should provide a concise and formal description of the issue being addressed. It is important to use imperative verbs in the subject line, as the changes are presented as actions to be performed. Avoid informal language or unnecessary words. To track patchs use a USP email. -
Body Message: The body provides a detailed explanation of the issue and the proposed solution. This section may include longer comments, technical details, and any relevant context to help reviewers understand the changes. Be clear and precise, ensuring the message is informative and professional.
-
Code Differences: This section displays the differences between the current code and the proposed changes. It highlights the modifications made in the patch, making it easier for reviewers to evaluate the impact of the changes. It is done automatically when using git send email.
By structuring your patch email in this way, you ensure clarity and professionalism, increasing the likelihood of your patch being accepted.
A detailed guide can be found at: Sending patches by email with git written by Matheus Tavares.
Summary
- Setting Git up to send emails
- How to use
git send-email - More tips on patch sending
Useful Commands
git format-patch -1 --stdout | ./scripts/checkpatch.pl --- Check patch code style errors.git send-email -<commits> --dry-run --suppress-cc=all --to=freesoftware2025@gmail.com- Test email sending to course email for verification and feedback. This test but not sent the email, to send it the flag--dry-runhave to be removed.git send-email --annotate --to="teste@email.com" --cc="test_cc@mail.com" -1- Send last patch and open the user editor to modying it.git send-email --annotate --cover-letter --thread --no-chain-reply-to --to="teste@email.com" --cc="mailing@list.com" -3 # for a patchset- Send a patch with some configurations.
Troubleshooting
Since Gmail is being accessed by an external application (a third-party app), it is necessary to enable the connection between Git and Gmail. This can be achieved by adjusting the email’s security settings or using a two-factor authentication method. While the latter option is more secure, it is not available for USP emails. Therefore, USP users can lower their email security settings, whereas other users are strongly encouraged to enable two-factor authentication for enhanced security.
Comments
The tutorial is clear and more for github users.
Tutorial 7: Sending a Real Patch
As a first practical exercise, let’s send a simple patch to the official Linux kernel. The objective is to contribute to the Linux kernel’s IIO subsystem or DRM AMD subsystem. The task involves creating and submitting a patch (similar to a commit) to the official Linux kernel repository using the corresponding latest developer branch. This process is carried out via a mailing list. To send the email, Git is utilized. For detailed instructions, refer to Tutorial 6: Sending patches by email with git.
Since students are not required to have deep knowledge of the Linux kernel and its subsystems, the patches suggested by the professor and mentors involve simple modifications to the code. These include code style corrections (though these are less likely to be accepted), removing duplicate code, eliminating unused functions, making small improvements, or other straightforward changes.
NOTE: The goal is to practice creating and submitting patches to the Linux kernel mailing list, not necessarily to have them accepted in the same course period. The focus is on understanding the workflow, adhering to coding standards, and communicating with maintainers.
IIO Subsystem
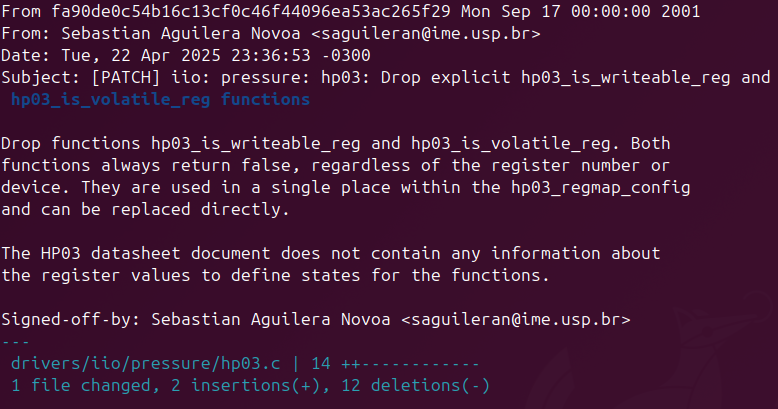
A simple patch to start contributing is removing duplicate code or functions. For the IIO subsystem, there are a few functions duplicated in the drivers. One example is located in the driver hp03, found at drivers/iio/pressure/hp03.c. This file contains four identical lines of code:
static bool hp03_is_writeable_reg(struct device *dev, unsigned int reg)
{
return false;
}

static bool hp03_is_volatile_reg(struct device *dev, unsigned int reg)
{
return false;
}
Both functions always return false, regardless of the register number or device. They are used in a single place within the hp03_regmap_config structure:
static const struct regmap_config hp03_regmap_config = {
.reg_bits	= 8,
.val_bits	= 8,

.max_register	= HP03_EEPROM_CD_OFFSET + 1,
.cache_type	= REGCACHE_RBTREE,

.writeable_reg	= hp03_is_writeable_reg,  // here
.volatile_reg	= hp03_is_volatile_reg,   // here
};
A naive solution would be to remove the function lines and directly replace them with false in the structure. However, this approach breaks the code style and completeness of the kernel driver structure, as all recent drivers are expected to include writeable and volatile functions based on the device’s characteristics. These functions are typically implemented based on the device’s datasheet, which defines the register values and possible states. Then, the naive solution may be:
static const struct regmap_config hp03_regmap_config = {
.reg_bits	= 8,
.val_bits	= 8,

.max_register	= HP03_EEPROM_CD_OFFSET + 1,
.cache_type	= REGCACHE_RBTREE,

.writeable_reg	= false,
.volatile_reg	= false,
};
The hp03 device, dating back to 2007, lacks detailed information about registers or states in its datasheet (HP03 Series of Calibrated Sensor Module). In contrast, modern devices, such as the BMP280 pressure sensor (BMP280 Datasheet), provide comprehensive details about registers and states, which are implemented in their writeable and volatile functions.
This explains why both functions in hp03.c return false and why any changes are not suitable in this case. The hp03 device, introduced in 2007, lacks detailed register or state information in its datasheet (HP03 Series of Calibrated Sensor Module). Consequently, the functions hp03_is_writeable_reg and hp03_is_volatile_reg are implemented to always return false, as there is no additional information to define specific behavior for these registers.
In contrast, modern devices, such as the BMP280 pressure sensor (BMP280 Datasheet), provide comprehensive details about registers and states. These details allow for the implementation of more sophisticated writeable and volatile functions based on the device’s characteristics. For the hp03 driver, however, any attempt to modify these functions without additional technical information would be inappropriate and could lead to incorrect behavior.
Patch
Feedback (waiting for)
DRM AMD Subsystem
The process done here is based in the patch https://lore.kernel.org/all/20250225015532.303032-1-luanicaro@usp.br/#Z31display:dc:bios:command_table_helper.h developed by Luan Icaro Pinto Arcanjo luanicaro@usp.br.
Because the IIO contribution is too simple, the focus patch shifted to another subsystem requiring less technical knowledge, specifically the DRM AMD Linux subsystem, to identify and address duplicate code lines. Using the arkanjo tool on the path linux/drivers/gpu/drm/amd, the following results were obtained with 100 % of similarity:
-
duplicados_amd_drm.txt: A report generated byarkanjolisting the number of repeated lines in descending order. -
output_parsed.txt: A parsed output listing files with duplicated code, separated by spaces and followed by their similarity coefficient, also ordered in descending order.
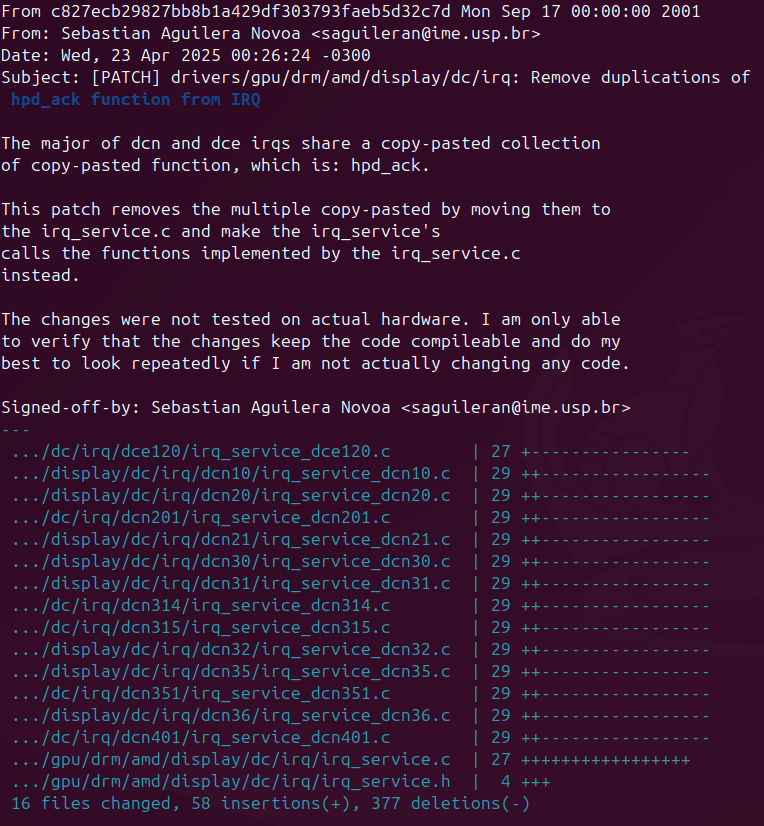
These results provide a starting point for identifying and addressing duplicate code in the DRM AMD subsystem, offering a more suitable opportunity for a beginner-level contribution. In summary, there are two functions duplicated many times on the linux/drivers/gpu/drm/amd/display/dc/irq/dc.
-
The
hpd_ack()function acknowledges a display hotplug (HPD) interrupt by reading the HPD status, clearing the interrupt, and flipping the interrupt polarity to detect the next plug/unplug event, ensuring proper handling of display connections.bool hpd_ack( struct irq_service *irq_service, const struct irq_source_info *info) { uint32_t addr = info->status_reg; uint32_t value = dm_read_reg(irq_service->ctx, addr); uint32_t current_status = get_reg_field_value( value, HPD0_DC_HPD_INT_STATUS, DC_HPD_SENSE_DELAYED); dal_irq_service_ack_generic(irq_service, info); value = dm_read_reg(irq_service->ctx, info->enable_reg); set_reg_field_value( value, current_status ? 0 : 1, HPD0_DC_HPD_INT_CONTROL, DC_HPD_INT_POLARITY); dm_write_reg(irq_service->ctx, info->enable_reg, value); return true; } -
The
to_dal_irq_source_dcnX()function maps hardware-specific interrupt source IDs (src_idandext_id) to standardizeddc_irq_sourcevalues, handling cases like VBLANK events, page flips, VLINE interrupts, HPD signals, and DMCUB notifications for display control on AMD DCNX GPUs. If no match is found, it returnsDC_IRQ_SOURCE_INVALID.
Both functions are located at the interrupt request (IRQ) module inside the Display Core (DC) linux drive. The same function is writen in many files with different Display Core Next (DCN) number and have exactly the same code lines. Those duplications are a good patch to send because may remove houndreds lines of code.
Patch
Feedback (waiting for)
Citation
If you found this useful, please cite this as:Novoa, Sebastián Aguilera (Mar 2025). Free Software Development Logbook. https://saguileran.github.io/blog/2025/free-software-development/.
or as a BibTeX entry:
@article{novoa2025free-software-development-logbook,
  title   = {Free Software Development Logbook},
  author  = {Novoa, Sebastián Aguilera},
  year    = {2025},
  month   = {Mar},
  url     = {https://saguileran.github.io/blog/2025/free-software-development/}
}
References
-
 FLUSP - FLOSS2025Website of the FLUSP research group: https://flusp.ime.usp.br/. Here are all the tutorials and more information about the group.
 -
 DeepSeek Chat (Version 1.0)2024Used por correct gramatic and improve text coherence. Oficcial website: https://www.deepseek.com